How to create an APEX Plugin
|
|
Basics
Since version 4.0 it is possible to extend the functionality of APEX with the so-called "Plugins". The plugins are used in the APEX Application Builder like ordinary components (eg. items, buttons, forms, etc.). According to there use, Plugins are separated in the following types:
- Region Type Plugins
- Item Type Plugins
- Dynamic Action Plugins
- Process Type Plugins
Plugins are ideal tools to modularize and adapt APEX applications to individual needs. An APEX Plugin is characterized by the fact that all files and programs that are necessary for the plugin are managed together in one place. These are PL/SQL-Programs and/or JavaScript code as well as CSS and image files. This makes it possible to reuse a Plugin and so it is quite easy to install it in another APEX environment.
The Development of the Multi-Marker-Map Plugin
Considerations
- the knowledge of the Google Maps API
- a PL/SQL function which automatically will be called during the rendering of the page (so called Callback function)
- a JavaScript function, which is the interface to the Google Maps API
Structure of the JSON Parameter String
{"gps": [
    {"base": [{
          "name": "Zentrum",
          "lat": 99.9999,
          "lng": 99.9999
        }]},
    {"marker": [
        {
          "name": "Marker 1",
          "lat": 99.9999,
          "lng": 99.9999
        },
        {
          "name": "Marker 2",
          "lat": 99.9999,
          "lng": 99.9999
        },
[...]
        {
          "name": "Marker X",
          "lat": 99.9999,
          "lng": 99.9999
        }
      ]}
  ]}
Explanation
| Row | Comment |
| 1 | The tag "gps" conctains as sub-information the data of the base location and all the markers. This is the master object. |
| 2 | The sub-object "base" contains the GPS position of the base location to align the map. |
| 3 | The element "name" stores the name of the GPS point (e.g. "London Tower Bridge"). This element will only be used within the "marker" sub-object. |
| 4,5 | The elements "lat" and "lng" containing the latitude and longitute of the GPS point. |
| 7 | The sub-object "marker" contains the name and position of the GPS position as described above. This object can be repeated and ist only limited by the max. length of the JSON string (32767 bytes). |
Example
{"gps": [
    {"base": [{
          "name": "Center",
          "lat": 52.518728,
          "lng": 13.376745
        }]},
    {"marker": [
        {
          "name": "Berlin Reichstag",
          "lat": 52.518728,
          "lng": 13.376745
        },
        {
          "name": "Berlin Siegessäule",
          "lat": 52.514716,
          "lng": 13.351682
        },
        {
          "name": "Checkpoint Charlie",
          "lat": 52.507468,
          "lng": 13.393611
        }
      ]}
  ]}
Step 1: Create the Plugin
Plugins are managed within the Applicatin under the Shared Components. Here you can import any existing Plugin as well as create a new Plugin (see Fig. 1, 2).
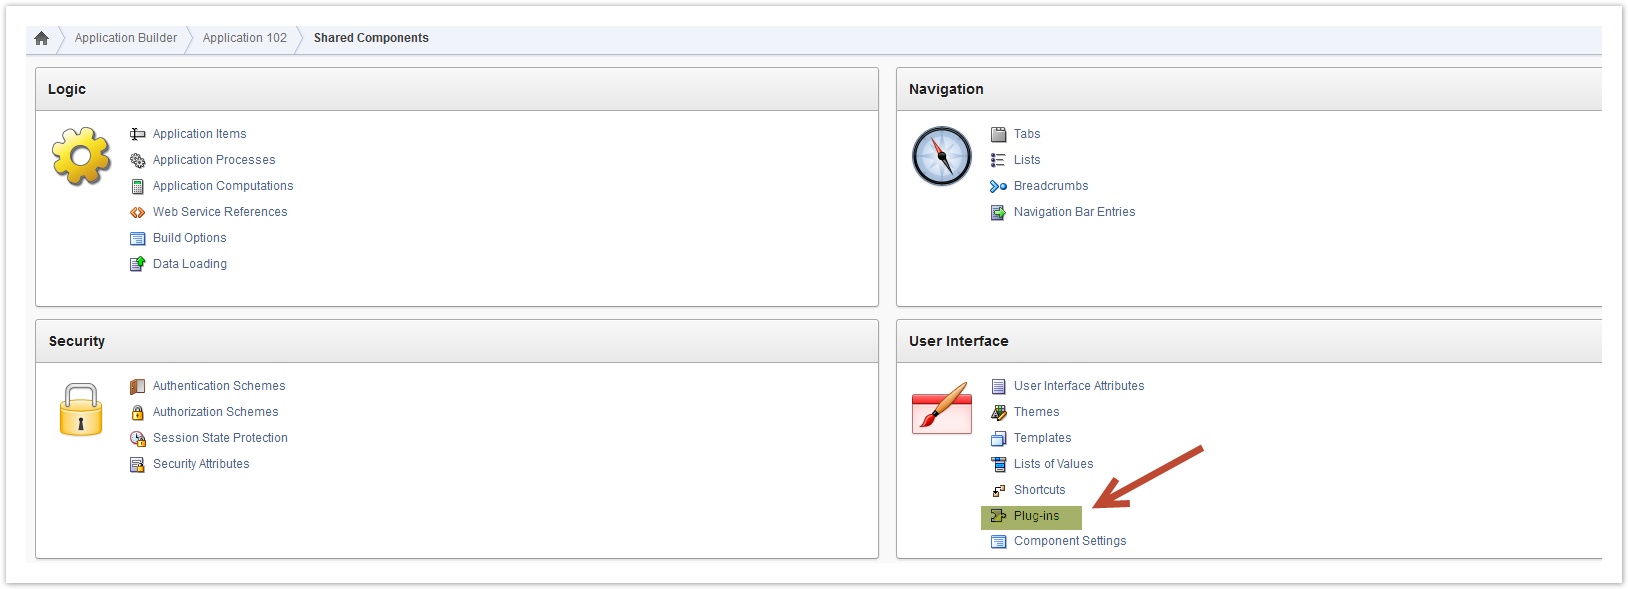
Fig. 1: Shared Components
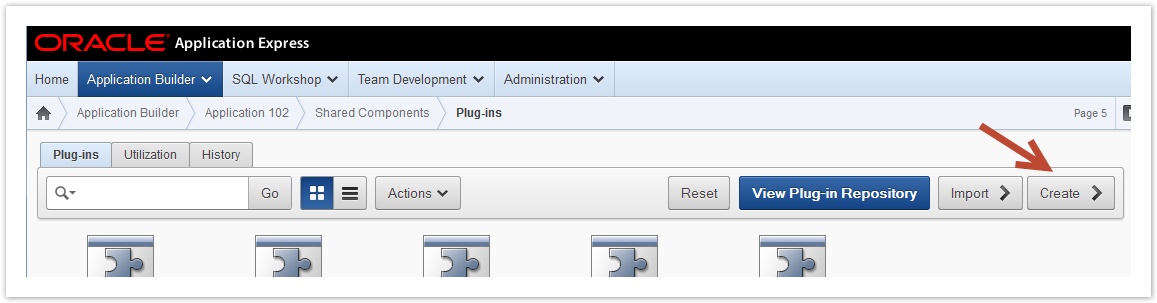
Fig. 2: Plugin Dialog within the Shared Components
After the creation of the (sill) empty Plugin, we have to enter some basic information. A Plugin allways has two names: The external name appears everywhere, where a developer can choose a Plugin. The intention behind the internal name is to share the Plugins in a worldwide community. So it is necessary to give it a unique name. Therefor it is recommendet to use the URL concept for the internal name. We choose GoogleMaps and com.apex-plugins.googlemap as external and internal name. Because, our new Plugin will be used on pages as a Page-Item we choose the type Item. Thats all so far to save the Plugin (see Fig. 3).
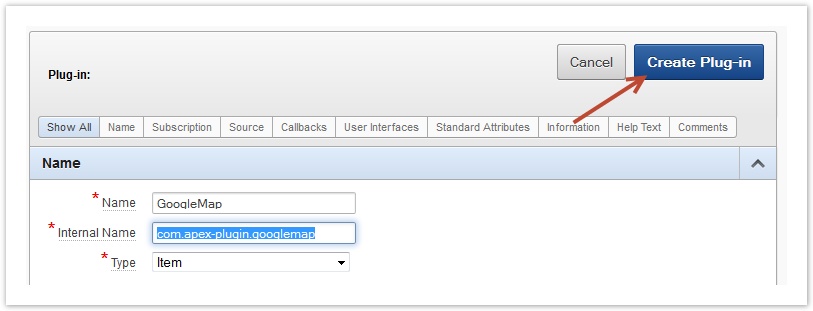
Fig. 3: create Plugin
Step 2: Programming
Now, the Plugin is saved rudimentary and it is available for the application developers BUT the functionality of the Plugin is still missing. To place the program code, we have three kind of so-called Callback Functions:
- Render Function: the most important function; it is used during the runtime when the page is rendered.
- AJAX Function: Dynamic "on-demand" processes can be programmed in this callback function. In this function you have also access to the global apex variables.
- Validation Function: Any validation process should be programmed here. Errors will be returned in the predefined record t_page_item_validation_result
The PL/SQL Rendering Function
The Rendering Function contains all the code which is needed during the rendering to display the element of the Plugin on the page. This can be simple HTML code as well as function calls to JavaScript libraries. In our example we use this to call the Google Maps API. The name of the function doesn't matter. The only thing to take care are the parameters because these are fixed. The name for the rendering function has to be entered in the section "Callbacks" in the appropriate field. (see Fig. 4).
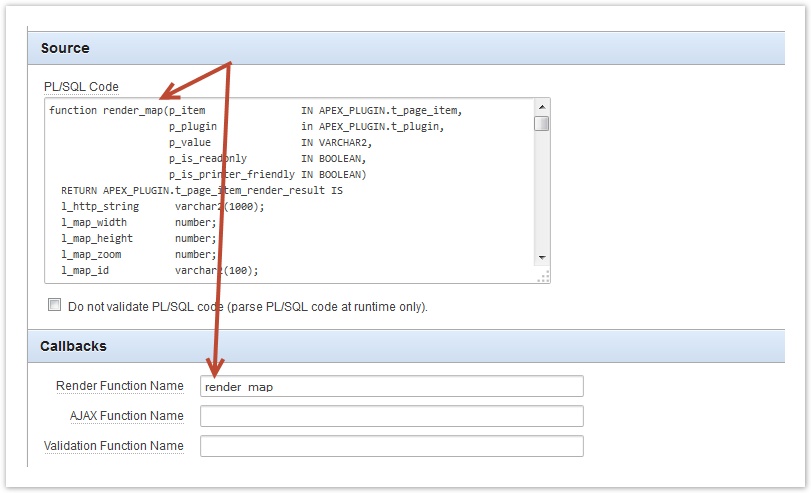
Fig 4: Assignment of the rendering function name
PL/SQL Code
function render_map(p_item                IN APEX_PLUGIN.t_page_item,
                    p_plugin              in APEX_PLUGIN.t_plugin,
                    p_value               IN VARCHAR2,
                    p_is_readonly         IN BOOLEAN,
                    p_is_printer_friendly IN BOOLEAN)
  RETURN APEX_PLUGIN.t_page_item_render_result IS
  l_http_string      varchar2(1000);
  l_map_width        number;
  l_map_height       number;
  l_map_zoom         number;
  l_map_id           varchar2(100);
  l_locations        varchar2(32000);
  l_result           APEX_PLUGIN.T_PAGE_ITEM_RENDER_RESULT;
begin
  l_map_width  := p_item.attribute_01;
  l_map_height := p_item.attribute_02;
  l_map_zoom   := p_item.attribute_03;
  l_map_id     := p_item.attribute_04 || '_' || p_item.name;
  l_locations  := p_value;
  if (l_locations is null) then
    l_result.is_navigable := FALSE;
    return (l_result);
  end if;

  if p_is_readonly or p_is_printer_friendly then
    APEX_PLUGIN_UTIL.print_hidden_if_readonly(p_item_name           => p_item.name,
                                              p_value               => p_value,
                                              p_is_readonly         => p_is_readonly,
                                              p_is_printer_friendly => p_is_printer_friendly);

    APEX_PLUGIN_UTIL.print_display_only(p_item_name        => p_item.name,
                                        p_display_value    => p_value,
                                        p_show_line_breaks => FALSE,
                                        p_escape           => TRUE,
                                        p_attributes       => p_item.element_attributes);

  else
    -- Google Library einbinden
    APEX_JAVASCRIPT.add_library(p_name           => 'http://maps.google.com/maps/api/js?sensor=false',
                                p_directory      => NULL,
                                p_version        => NULL,
                                p_skip_extension => TRUE);

    -- Eigene JS Library einbinden
    APEX_JAVASCRIPT.add_library(p_name           => 'de.mdkbw.apex.plugin.googlemap',
                                p_directory      => p_plugin.file_prefix,
                                p_version        => NULL,
                                p_skip_extension => FALSE);

    --
    l_http_string := '<div id="' || l_map_id || '" style="width: ' || l_map_width || 'px; height: ' ||
                     l_map_height || 'px;"> </div>';
    SYS.HTP.PRN(l_http_string);
    --
    APEX_JAVASCRIPT.add_onload_code(p_code => 'googleMap("' ||
                                              p_item.name || '", ' || '{' ||
                                              APEX_JAVASCRIPT.add_attribute(p_name      => 'map_width',
                                                                            p_value     => l_map_width,
                                                                            p_add_comma => TRUE) ||
                                              APEX_JAVASCRIPT.add_attribute(p_name      => 'map_height',
                                                                            p_value     => l_map_height,
                                                                            p_add_comma => TRUE) ||
                                              APEX_JAVASCRIPT.add_attribute(p_name      => 'map_zoom',
                                                                            p_value     => l_map_zoom,
                                                                            p_add_comma => TRUE) ||
                                              APEX_JAVASCRIPT.add_attribute(p_name      => 'map_id',
                                                                            p_value     => l_map_id,
                                                                            p_add_comma => TRUE) ||
                                              APEX_JAVASCRIPT.add_attribute(p_name      => 'map_locations',
                                                                            p_value     => l_locations,
                                                                            p_add_comma => TRUE) ||
                                              '});');
    --
  end if;
  l_result.is_navigable := TRUE;
  return(l_result);
end;
Explanation
| Row | Comment |
|---|---|
| 1-6 | The effective name of the render function has to be entered in the section Callbacks to tell APEX which function is to call during rendering. Parameter and return value are fixed. |
| 15 | The local variable l_map_width stores the content of the custom attribut 1 of the Plugin. |
| 19 | The value of the item will be transfered into the local variable l_location. This value stores the JSON string with the GPS positions. |
| 25-36 | If the page is shown "printerfriendly" the item will be invisible; if it's "readonly" the item is "displayonly". |
| 39 | Include the JavaScript library of the Google Maps API |
| 45 | Include our own JavaScript library where the communication to the GoogleMaps API is programmed. (see next chapter) |
| 51-53 | Place the Item on the Page with the given layout (width, height) |
| 56-73 | The function add_onload_code is inserting the JavaScript code which is loaded when the onload-trigger is executed. This calls the function which is included in line 48. |
| 76 | Return the record of the type T_PAGE_ITEM_RENDER_RESULT which a least should contain a "TRUE" if the item is navigable. |
The JavaScript Function
In the PL/SQL Program above, the JavaScript function googleMap will be called during the onload-event of the HTML page. This function creates a connection to Google Maps and places the markers on the map. To use our own JavaScript function within a Plugin, we have to upload it first in the section Files of the Plugin (see Fig. 5). The name of the JavaScript file is used to include it within the PL/SQL Program with the add_library function. Be careful and don't forget to leave the extention ".js"!
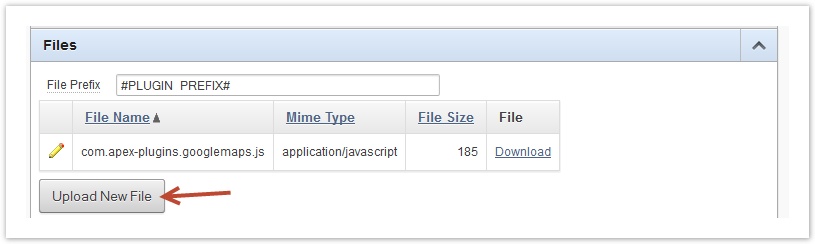
Fig. 5: Upload of the JavaScript library
JavaScript Code
/*
 * Javascript for the APEX Plugin Multi-Marker-Map
 * Author: Stefan Armbruster
 * Date: 27.10.2014
 *
 */
function googleMap(pItemID, pParameter) {
  var lParameter = apex.jQuery.extend({
                      map_width: 640,
                      map_height: 480,
                      map_zoom: 12,
                      map_id: pItemID + "_MAP",
                      map_locations: ""
                      }, pParameter);


  if (lParameter.map_locations.length == 0) {
    return;
  }
  /* Convert the JSON String into an Objekt */
  var oLocations = JSON.parse(lParameter.map_locations);
  /* the JSON String must contain the 2 objects "base" and "marker" */
  if (Object.keys(oLocations.gps).length != 2) {
    alert("GPS-JSON Object not valid ");
    return;
  }
  /* center the map to the point given in the parameter lParameter.base_location  */
  var lBaseLat = oLocations.gps[0].base[0].lat;
  var lBaseLng = oLocations.gps[0].base[0].lng;
  var lBaseLatLng = new google.maps.LatLng(lBaseLat, lBaseLng);

  /* Display the map */
  var lMapOptions = {
    zoom: lParameter.map_zoom,
    center: lBaseLatLng,
    mapTypeId: google.maps.MapTypeId.ROADMAP
  }
  var lMap = new google.maps.Map(
    document.getElementById(lParameter.map_id),
    lMapOptions
  );
  /* put the markers */
  var lMarkerCount = Object.keys(oLocations.gps[1].marker).length;

  var infowindow = new google.maps.InfoWindow();
  for (var i=0; i<lMarkerCount; i++) {
    var oMarkerLocation = oLocations.gps[1].marker[i];
    var lLat = oMarkerLocation.lat;
    var lLng = oMarkerLocation.lng;

    var lMarker = new google.maps.Marker({
        position: new google.maps.LatLng(lLat, lLng),
        map: lMap
      });
    google.maps.event.addListener(lMarker, 'click', (function(lMarker, i) {
        return function() {
          infowindow.setContent(oLocations.gps[1].marker[i].name);
          infowindow.open(lMap, lMarker);
        }
      })(lMarker, i));
  }
}
Explanation
| Row | Comment |
|---|---|
| 8 | Use the jQuery function extend to set the missing parameters with default values. |
| 17 | The string map_locations contains the GPS coordinates. It it's empty, return immediatly. |
| 21 | Convert the JSON string into the object oLocations |
| 23-26 | |
| 28-30 | Assign the values of latitude and longitude to align the map; create a new GoogleMaps object LatLng to pass the position to the map. |
| 33-37 | Assign the settings of the map like zoom-factor or map-type ("ROADMAP"). |
| 38-41 | Show the map at the position given in the parameter map_id |
| 43 | Determine the number of markers (with the length of the markers array) |
| 45 | The "Info Window" is to show the name of the marker |
| 47-54 | Create a new marker with the given information of a particular "marker" and place it on the map. |
| 55-60 | Add a listener to show the info window when click on the marker |
Step 3: Plugin Attributes
Standard Attributes
Step 3: Plugin Attributes
All Object which are used within APEX have several attributes to adjust the size, apperance, etc. of the item. For our new GoogleMap item we have to set which attributes can be used. This can be done in the section "Standard Attributes". (see Fig. 6).
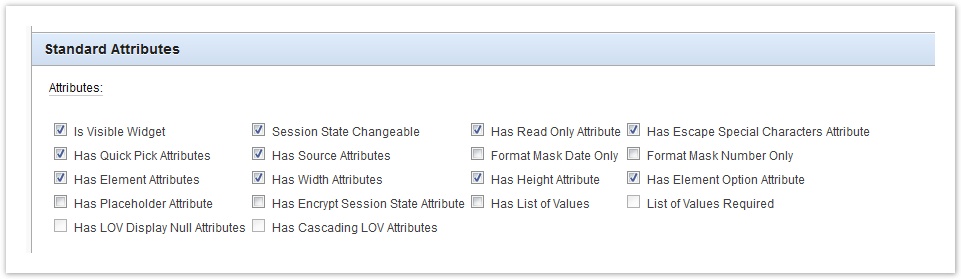
Fig. 6: selected Attributes for our Plugin
Custom Attributes
Beyond the standard attributes we need a few adjustments to control the appearance of the map. These settings are individual and depend on the type of Plugin. In our case we need the size (width, hight) and the default zoom-factor. In addition we should have a seperate name to make sure, that the HTML object will have a unique name. We can access these attributes very easily from PL/SQL (as we saw in the code snippet above). For each of these attributes we add an entry in the section Custom Attributes as shown in Fig. 7,8)
Für jedes dieser Attribute wird im Abschnitt Custom Attributes ein Eintrag angelegt in der verschiedene Einstellungen wie z.B. Label, Datentyp, Default Value, etc. vorgenommen werden können. Diese Attribute werden bei der Verwendung des Plugins im Application Builder abgefragt (siehe Abb. 7 und 8).
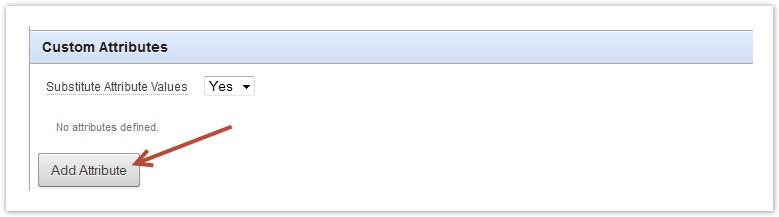
Fig. 7: Add a Custom Attribute
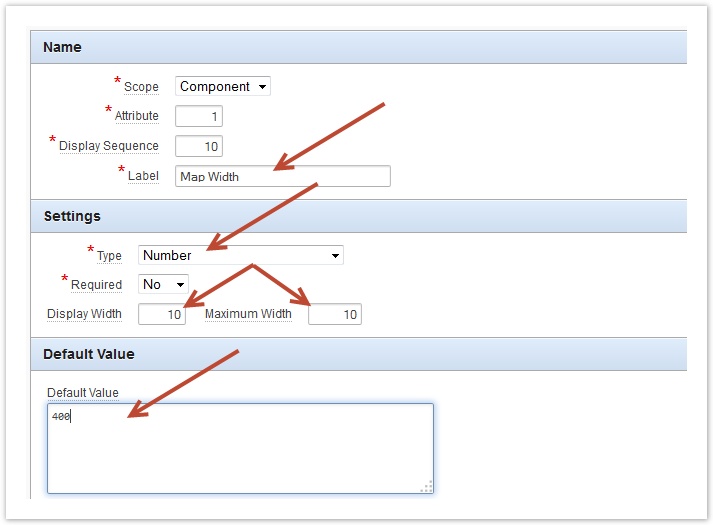
Fig. 8: Adjustments of a Custom Attribute
At the end we should have four attributes like in Fig. 9. The sequence of the attributes of course is very important because within the PL/SQL function we transfer the content of the attributes exactly in this order (see line 15-18 of the rendering function).
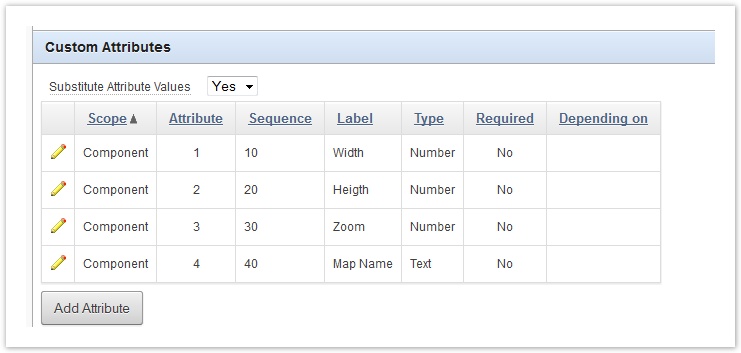
Fig. 9: The custom attributes of our Plugin
Use it!
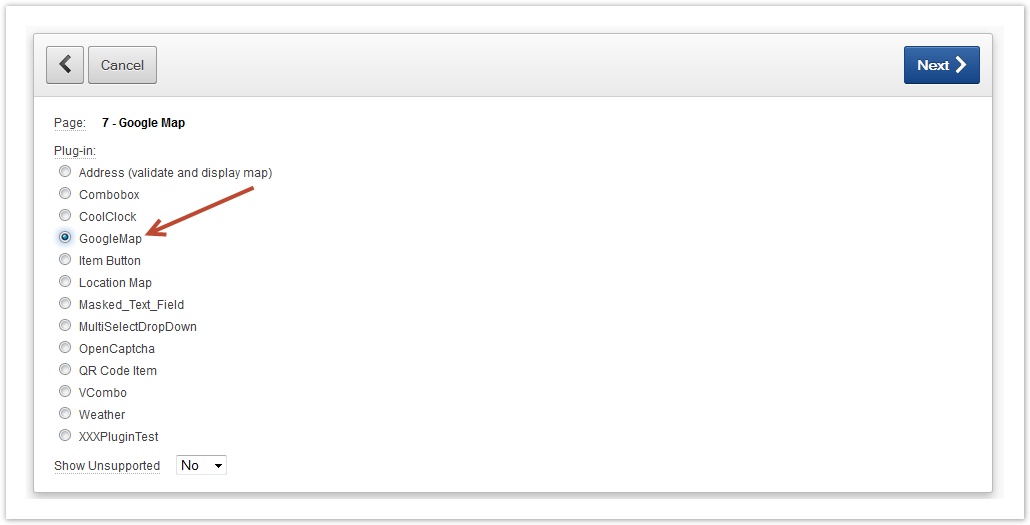
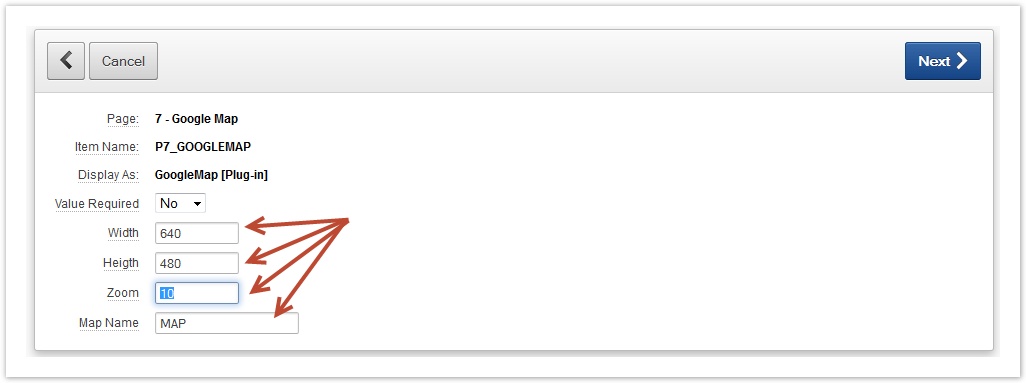
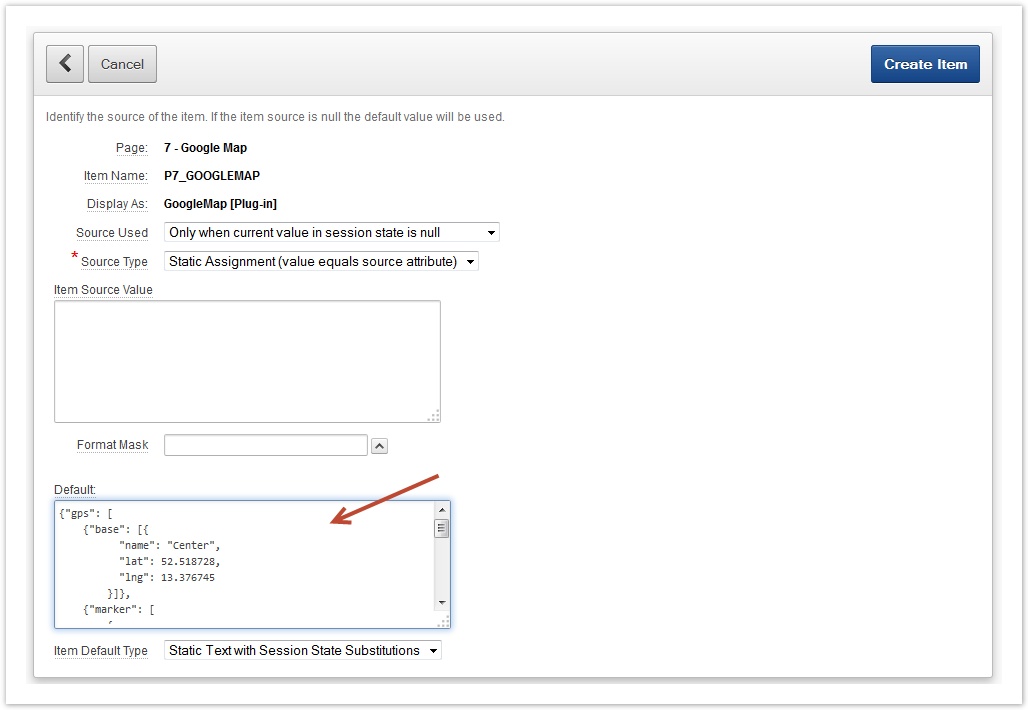
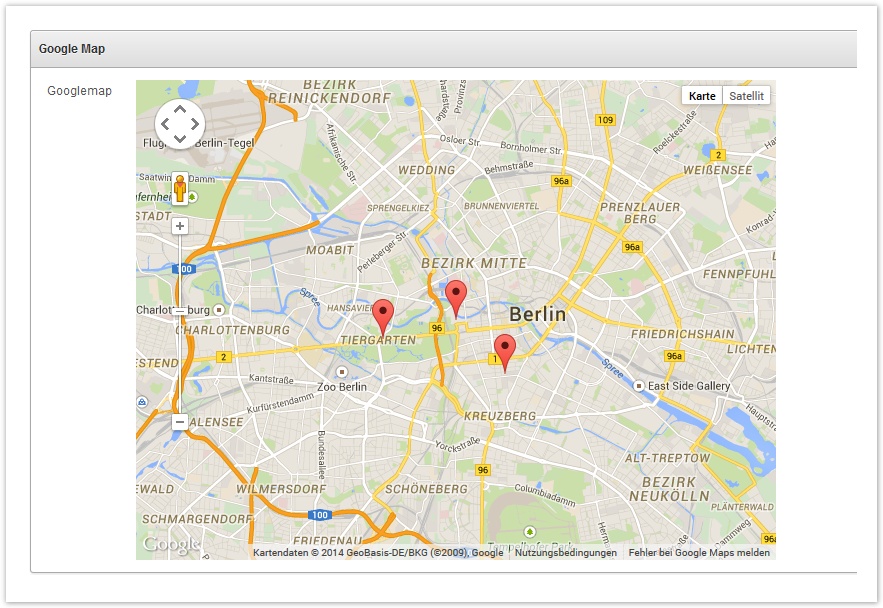
If we executed all the described steps correctly, we should now be able to use our new Google Maps Plugin. Therefor just place a new element of the type "Plug-ins" on your page and step through the dialog. You will find the new "GoogleMap" Plugin as well as our custom attributes (see the following pics).
Congratulation!
This is how the new Plugin looks like:
To see a live demo of the Plugin click here.
Appendix
Example PL/SQL Package to create a JSON String
Download the entire example PL/SQL package to create a JSON String.
Documents and Links
- Inside APEX - How To Plugin
- Google Maps API V3
- Oracle Tutorial: Using and developing plugins
- Integrating APEX with Google Maps (White Paper, PDF)
- APEX 4.0 Plugins Entwickeln
- In 30 Minuten zum ersten APEX Plugin (PDF)
- Demo of a improved version of this Plugin

Visits
Today 154 | Week 4024 | Month 44249 | All 1431786
Donalds Daily Dumbs (The Guardian)
Donald Trump | The Guardian
18 July 2026
News about Donald Trump, the 45th and 47th US president, including comment and features from the Guardian
-
Fact-checking Donald Trump’s address on Chinese election interference – video
Donald Trump delivered a primetime address to the country on Thursday, claiming that
... -
Experts cast doubt on Trump and DHS chief’s claim 250,000 noncitizens are registered to vote in four US states – as it happened
This blog is now closed.
-
Who won the World Cup? – Stateside with Kai and Carter
The 2026 World Cup final has not happened yet, but we already know that there were some clear
...
Latest Articles
Most Popular Articles last 24h
- Gegen alle Widerstände zum Erfolg: Trondheim - Oslo 2017 - 58 hits
- Ein Sommermärchen: Trondheim - Oslo 2014 - 50 hits
- Schlaflos in Le Mans - 48 hits
- Ausgebremste E-Autos - 47 hits
- Akkus für E-Mobilität - Wie geht es weiter? - 46 hits
- Parkplätze - Platzverschwendung - 45 hits
- Coal: Get out of it - 43 hits
- Erderwärmung - Geo-Engeneering - 42 hits
- E-Autos mit besserer CO2 Bilanz als angenommen - 42 hits
- eRoller - Neue Wege urbaner Mobilität - 40 hits
Most Popular Articles last Week
- How to handle Oracle BLOB columns via Database Link - 652 hits
- Schlaflos in Le Mans - 190 hits
- Ein Sommermärchen: Trondheim - Oslo 2014 - 182 hits
- Gegen alle Widerstände zum Erfolg: Trondheim - Oslo 2017 - 175 hits
- Die Wasserschlacht am Dovrefjell: Trondheim - Oslo 2013 - 167 hits
- Coal: Get out of it - 153 hits
- E-Autos mit besserer CO2 Bilanz als angenommen - 151 hits
- Ausgebremste E-Autos - 150 hits
- Wie Fahrräder die Städte erobern können - 149 hits
- Akkus für E-Mobilität - Wie geht es weiter? - 145 hits
Popular Tags
Challenges Completed


StackOverflow